Last year I blogged about the wreath I made for our front door because it was one of the most easiest, cheapest DIY’s I’ve ever done. (And there’s nothing like greeting people who walk into your home with ‘easy’ and ‘cheap’, right?) But this is the best kind of easy and cheap because it doesn’t look it AT ALL. And you can make small changes to it so it goes with every season.
I’m re-blogging with an updated version, because the little changes I made for this Spring make this one my ABSOLUTE. FAVORITE. Check it out!

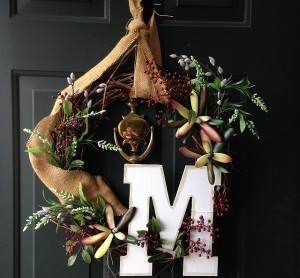
DIY Spring Wreath
This is literally as easy as putting the wreath up, tying a wooden letter to it, draping a ribbon, and shoving floral stems into it. That’s what I love about the wreath – you can just tuck branches into it anywhere and they stay put. So, to recap our steps:
- hang wreath
- tie letter on using string or twine
- drape ribbon
- shove florals into it.
Then pour yourself a nice glass of wine and admire your bad-ass front door statement piece, you Peggy Pinterest, you.
You can get the wreath itself at a low price from any craft store – mine came from Michael’s.
Or if you’re feeling splurge-y, you could go for this one I found on Amazon (which I’m loving and now regretting I didn’t see it first):
Wild Birch Wreath Bases, “Wild & Woodsy”, Natural & Hand Tied With No Wire, 14 Inch, Exclusive

Then you’ll want to get your wooden letter for your initial. I painted mine white, because I’m an idiot who didn’t realize you can actually order them already painted. Don’t be like me. Grab your letter, here: White Wooden Letters A-Z
Now add your ribbon. I like the natural style, but you’ll see when you click on the item it will give you a bunch of different color options:

Kel-Toy High Quality Jute Burlap Ribbon, 4-Inch by 10-Yard, Natural
Lastly, add your florals and berries! Michael’s frequently does 40% off sales, so I got mine on a day they were running that deal on the florals and I scored big. I forgot to snap a pic, but it was basically one pussy willow sprig, 1 succulent sprig, and a simple green cluster of florals. I used plyers to clip off all the pieces and tuck them in randomly.
Viola – happy SPRING!!

For the first version I made of this, with the full tutorial and pics, go here: DIY Spring Wreath Tutorial

 Add to favorites
Website: http://www.punkwife.com/blog-2/


Cydnee/Tampa Cake Girl
Lovely spring wreath. Great tutorial and pictures. Thank you very much for joining in the celebration of #purebloglove, we enjoy having you each week. I hope to see you on Thursday at 8PM, EST through Sunday night. ~Cydnee